Monday, November 3, 2008

Pre-election Bake.


Waiting for tomorrow's outcome has me nervous. Gotta keep busy...


Figured I could get caught up on my blog. Been baking bread a couple times a month. Oven works great, but still learning its pattern.

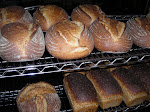
Today I baked 18 pounds of dough made up into 11 loaves. The dough was phenomenal. The oven was a little too hot, but not extreme. Getting the timing on when to fire, when to clean out, etc. in sinc with the dough seems to be the trick, but I'm ok with darker bread some weeks.

So here's the formula:
10# flour
8# water at about 65F
90 g salt
45 g dry yeast

Pre-heat oven: about 3 hours of fire the night before(great time to make flatbread)
Mix at 8:00 PM night before, mix until fairly lumpless, don't bother with kneading
Start fire 7:45am
Pour onto table 8:00am, fold well, then fold about every 15 minutes til about 10.
Divide and preshape about 10
Spread remaining coals from fire across hearth
Shape onto cloth or into bowls 10:30
Clean oven & mop an hour before baking.
Load into oven about 11:30 or 12:00

Today's bake took 15 minutes! Bread has a thin crust, moist and open crumb, great taste.

Time to put in the Granola.

Thursday, July 31, 2008

First Bread


So we made a small batch of bread yesterday. Fired, then immediately baked. The oven held its temperature a little longer, but still not up to speed. These baguettes baked in about 14 minutes I think. They baked a little too fast, but were incredible with butter and marmalade. More like pastry.

Just gotta keep firing it and dry it out a little more. Then we can start really baking. Rye breads and granola... and maybe we can roast coffee!!

Sunday, July 20, 2008

First Bake


The oven burns real nice. I seem to have gotten door size and arch just right. We're still drying out all the layers of material, so it's not holding heat yet. But it sure produces incredible wood fired pizza!

Wednesday, July 9, 2008

Protection for my Wood Fired Oven


I figured that it might rain in a day or two, so I got a bunch of used lumber and put a roof over my oven. I missed a deal on some job left-overs for the shingles by a day, so I went and bought new ones. The 2 x 8 was "used" and I got it for 2 bucks. The posts are from a cedar that was growing too close to the house. So the whole roof including the stove pipe and pipe collar cost about $90.

Thursday, July 3, 2008

Final Layer of Mud

The final layer was made from the same mix as the arch core, but with the addition of straw. The final layer went pretty quick. It was only 1 - 1 1/2 inches thick. More like a thick plaster. Plus with the straw in it, it seemed OK to put it on a little wetter.

Once it dried a bit, we smoothed it out by rubbing it with a board. Now we just have to let it dry a bit, put some fires in it to burn out the forms, let it dry some more... and soon we'll be baking great bread.

Tuesday, July 1, 2008

Chimney


While the insulating layer was going on, I made a couple of custom adobe chimney blocks. Once these had hardened a bit, I extended the chimney base up about 10 inches. The blocks were molded before I had the straw on site so I mixed sawdust into the mud to reduce cracking. But I had the straw when I laid them up, so that's what you see in the mud "mortar".


Once the block was in place, I plastered it smooth. The first part of the oven to be in a finished state. I was elated at this point. My past experiences with oven chimney building had put me in a very reluctant state about this part of the process. But this chimney was a breeze to design and build.


Here it is shown with about one third of the oven having it's final mud layer.


Next I made up several adobe bricks to finish the chimney top. It was sunny, so I only had to wait about 30 hours for them to firm up nicely. Then I made an arch over the chimney, filled in the front face, but left it open on the back to accommodate a stove pipe.

Sunday, June 22, 2008

Thermal Break

In order to hold the heat in, an insulating layer is applied to the oven. This forms a thermal
break between the outside and the inside. The 4" of dense dry mud absorbs heat from the fire and then gives it back. By insulating it, that heat goes more into the oven than out into the atmosphere. I used two different mixes for insulating. One was with a coarse sawdust and high clay content soil mix. The other was our regular mud mix and lots of straw.Notice the bottle on the right side of the oven; the arch insulating layer is continuous with the insulation layer under the hearth encasing the whole oven.

Wednesday, June 18, 2008

Arch Mud Fun

The final mix for the arch mud (some people insist on calling it "cob", or "clay") was a challenge. The soil on site is basically beach sand with some silt and humus. Which for the sub-hearth I added a little left-over potters clay. But this was going to be insufficient for the structural requirements of the arch unless I wanted to re-hydrate lots and lots of potters clay. So I looked about town and found some high clay content sub-soil from a city project that they let me have. The clay content was very good, but the gravel/stone content was pretty "good" too! I mixed this soil with the sand from my yard, and some other silty-clay soil that I came by in my travels. In retrospect, I think I could have increased the sand content, maybe up to double, but it worked well with minimal cracking.

It's hard not to get some cracking in a four inch thick mass of wet mud as it dries! I just filled them, and put another layer over the whole thing.

Thursday, June 12, 2008

Designing the Oven


So I settled on a chimney base that I think will work for this oven. Measured the height, and then calculated the correct height for the oven arch (x=doorheight/.63), and built a form 2" inside a cantenary arch (the arch center is inside the 4" mud arch).

The form will be burnt out once the arch has dried sufficiently and the nails will be swept out. This stage took a lot of sitting and staring.

Here's a close-up of the aluminum channel that my "automatic" closing door will hang in. More on that later.

Thursday, June 5, 2008

Sub Hearth and Hearth


The first picture shows the finished beer bottle layer with the hearth extension done in mud. Then I put a 2.5" layer of mud over the whole thing as a sub-hearth. Notice the beer bottle layer is 3" bigger all the way around the baking part of the hearth. This insulating layer will eventually be wrapper around the whole oven. The front part is the future door area and chimney base. The sub-hearth was made with a mud mixture extremely high in fine sand. This is partly due to this is what I had, but also I wanted a very dense layer to absorb and hold heat.

The Hearth is made of fire brick. I got a good deal on some surplus fire brick at fourty-five cents each, but it wasn't enough. So I bought 60 new brick for the hearth and am using the old bricks for the extension/door/chimney base area. The new brick are Whitacre-Greer out of Ohio. We'll see how they perform. The brick are laid up dry on a thin layer of dry sand (for leveling).

At this stage I am also playing around with different chimney/door configurations...

Sunday, May 25, 2008

Slab and Insulating Layer


I feel like I copped out a bit at this level. I built a concrete slab to set the oven on. One of my intentions with this project was to do it with recycled, re-used, cheap, or free materials. But the slab was the obvious way to get what I wanted: a strong, flat surface about 30" above the ground.

I filled the slab with re-bar & mesh. That oven might get heavy over a 32" span. Greta and Brandon came up for the weekend and they mixed on a tarp in the back of the pick-up truck. That way we could pour right into the form without lifting. That was Greta's idea. Actually a really fantastic idea!!! It took us about 90 minutes. They were awesome. I wish I had pictures, but it was over before I knew it.

The next step required a lot of beer drinking. Some friends helped. And a neighbor contributed too. The beer bottles are laid out with an inch or so between them and the voids are filled with a mixture of coarse sawdust coated in clay. Just enough to stick together and reduce chance of catching fire. I think there ended up being around 100 bottles. I wonder if we could work this into an ad campaign for Magic Hat. The empty bottles and sawdust create a temperature break between the oven hearth and the concrete slab. That way the slab doesn't draw heat out of the oven that should be kept in the oven for baking.

Saturday, May 10, 2008

The Foundation

I started with a great deal on some surplus block. Laid up two walls to support a slab that would be the base of the oven. The block were laid dry on a trench filled with recycled concrete gravel. At this point I still didn't know exactly what type of oven I would be building. My last oven was a massive 7' x 5' (inside dimension) brick & calcium aluminate encased beauty that we built for a bakery-cafe that would bake 60+ loaves at a time, roast coffee, etc. This time I am leaning toward a home-hobby oven, something I can bake a dozen baguettes in, pizza parties, or...