In order to hold the heat in, an insulating layer is applied to the oven. This forms a thermal
break between the outside and the inside. The 4" of dense dry mud absorbs heat from the fire and then gives it back. By insulating it, that heat goes more into the oven than out into the atmosphere. I used two different mixes for insulating. One was with a coarse sawdust and high clay content soil mix. The other was our regular mud mix and lots of straw.Notice the bottle on the right side of the oven; the arch insulating layer is continuous with the insulation layer under the hearth encasing the whole oven.
Sunday, June 22, 2008
Wednesday, June 18, 2008
Arch Mud Fun
The final mix for the arch mud (some people insist on calling it "cob", or "clay") was a challenge. The soil on site is basically beach sand with some silt and humus. Which for the sub-hearth I added a little left-over potters clay. But this was going to be insufficient for the structural requirements of the arch unless I wanted to re-hydrate lots and lots of potters clay. So I looked about town and found some high clay content sub-soil from a city project that they let me have. The clay content was very good, but the gravel/stone content was pretty "good" too! I mixed this soil with the sand from my yard, and some other silty-clay soil that I came by in my travels. In retrospect, I think I could have increased the sand content, maybe up to double, but it worked well with minimal cracking.
It's hard not to get some cracking in a four inch thick mass of wet mud as it dries! I just filled them, and put another layer over the whole thing.
Thursday, June 12, 2008
Designing the Oven
So I settled on a chimney base that I think will work for this oven. Measured the height, and then calculated the correct height for the oven arch (x=doorheight/.63), and built a form 2" inside a cantenary arch (the arch center is inside the 4" mud arch).
The form will be burnt out once the arch has dried sufficiently and the nails will be swept out. This stage took a lot of sitting and staring.
Here's a close-up of the aluminum channel that my "automatic" closing door will hang in. More on that later.
Thursday, June 5, 2008
Sub Hearth and Hearth
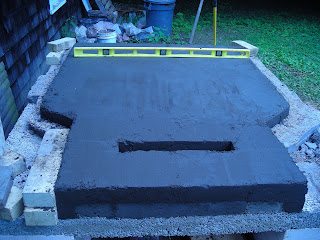
The first picture shows the finished beer bottle layer with the hearth extension done in mud. Then I put a 2.5" layer of mud over the whole thing as a sub-hearth. Notice the beer bottle layer is 3" bigger all the way around the baking part of the hearth. This insulating layer will eventually be wrapper around the whole oven. The front part is the future door area and chimney base. The sub-hearth was made with a mud mixture extremely high in fine sand. This is partly due to this is what I had, but also I wanted a very dense layer to absorb and hold heat.
The Hearth is made of fire brick. I got a good deal on some surplus fire brick at fourty-five cents each, but it wasn't enough. So I bought 60 new brick for the hearth and am using the old bricks for the extension/door/chimney base area. The new brick are Whitacre-Greer out of Ohio. We'll see how they perform. The brick are laid up dry on a thin layer of dry sand (for leveling).
At this stage I am also playing around with different chimney/door configurations...
Subscribe to:
Posts (Atom)